So if you are anything like me, trimming the kite can sometimes be more than a little bit confusing, should you pull this or pull that, connect here or connect there? Conditions are different every day so just because you trimmed your kite one way today doesn’t mean you’ll have the same setup tomorrow.
Fear not…we’ve sweated this one out over the years and this article is the sum of our mistakes and insights, simplified to a level that actually makes sense (hopefully…if not let us know in the comments and we’ll clarify!).
The aim here is to give you the basic knowledge to start trimming your own kite effectively.
Not to delve deep into aerodynamic theory.
For that reason and for any aerospace engineers out there, we are at times over simplifying reality slightly…this is done intentionally to avoid having to go into too much complex theory and enable us to get across the basic concepts in a format that you guys can actually use and apply. So if, after reading this and doing some deeper research, you find that we have bended the truth a little, please understand that it is the concepts we are trying to get across, not Einsteins theorems.
Why Trim Your Kite?
The most basic reason we trim our kite is to change the power in the kite. To ensure that it is safe and flying efficiently for the weather conditions of that day. Our aim is to be able to handle the kite safely by trimming it to a level of power we can handle, thus ensuring the kite flies properly and doesn’t fall out of the sky at the first lull in the wind, or rip us off down the beach the second we put it up.
Obviously every kite handles differently and there are many different types and makes of kites that all require their own trimming techniques. But the science behind them all is the same.

Trimming Using The Trim Strap
The first method we will look at is trimming the kite using your trim strap. Trim straps can be located above or below the bar but all function in the same way. The trim strap can be adjusted to give more or less power and works by changing the length of your front (centre) lines.
By pulling the trim strap you are changing the angle of the kite relative to the wind. This is called the angle of attack (AOA).
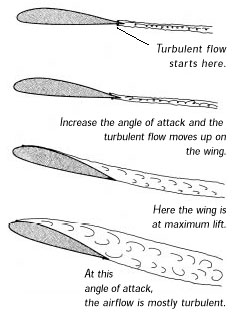
Imagine the position of the kite above your head when it is at 12 o’clock. If you shorten the front lines you are effectively pulling the leading edge down towards you, lifting the trailing edge. This will (in optimal conditions) change the angle of attack of the kite meaning that the air flow over it is less efficient (more turbulent), thus decreasing the power.
So to power up the kite again, it is the opposite. We lengthen the trim tab which lifts the leading edge up away from us, lowering the trailing edge and ensuring that the kite is splitting the oncoming wind like a knife, giving us smooth (laminar) air flow over both exterior surfaces of the kite. Increasing the lift generated by the kite.
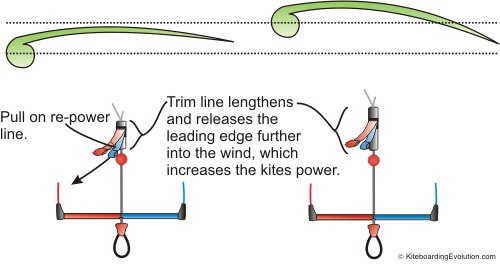
Image Courtesy of KiteboardingEvolution.com
I find the easiest way to think of this is in terms of the outside/back lines as we all know what effect they have on the kite. When you pull the bar in you know that you are powering the kite up (as long as you don’t over sheet in which case it stalls…more on that later) In terms of what you are doing with the lines, you are effectively shortening the outside lines, as they get shorter in comparison to the fixed centre lines.
So as we shorten the outside/back lines, at the same time we effectively lengthen the centre lines (in comparison with the back lines) which is the same effect as letting the trim strap out, which as we know, powers the kite up.
This is a real long winded way of explaining this but I find it the easiest way to consistently get a good understanding of trimming, but please, take a moment to visualize this and check you’ve got it.
Conversely as we let the bar out, we are lengthening the outside lines, which implies we are shortening the centre lines (or pulling the trim strap in) which has the effect of de-powering the kite.
This is how my poor brain keeps track of whether I should be pulling the trim strap towards me or letting it out, by comparing it to an effect I am sure of…that of pulling the bar in or letting it out.
Testing The Kite For Power
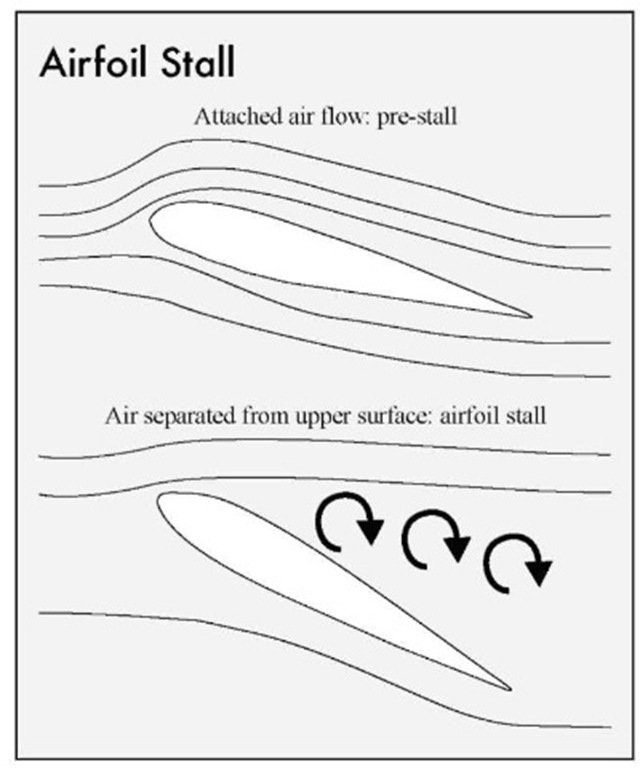
When we’re teaching, something we do every time before we let a student fly a kite, is launch the kite and fly it at the 12 o’clock position. From here we pull the bar all the way in and hold it there. In doing this we’re checking to see if the kite starts to stall. If the kite immediately starts to fall out of the sky, backwards, then the back lines are too short, i.e. the kite is over-sheeted, the angle of attack is too acute and the airflow over the kite is too turbulent to allow it to generate enough lift to stay in the sky. Think of a plane trying to fly directly upwards without enough power.
The kite should sit in the sky comfortably for a good few seconds, or preferably for ever, before it starts to stall if it is trimmed correctly. Note, when pulling the bar in, the kite will (most likely) shift back a little bit in the window, as long as it holds this position and doesn’t continue to fall, all is good.
Word to the Wise
On light wind days or when highly under powered a kite will stall even if well trimmed as it is impossible to trim a kite correctly outside of its wind range.
Trimming Using The Kite Lines
If once we have used the trim tab, the kite is still not correctly trimmed then we have to look at changing the points at which the outside/back lines attach to the kite. By attaching the lines either closer or further away from the kite we can set the kite for more or less power. The shorter we make the back lines, the more powerful we are making the kite (the same as pulling the bar in). Conversely the longer the back lines the less powerful the kite will be (letting the bar out). It works along the same principle as the trim tab, lengthening the back lines changes the angle of attack, decreasing the power in the kite.
Testing The Kite For Steering
When we test fly kites on the beach, we are also testing the steering. The back lines (outside lines) control this, as these are attached to the wing tips of the kite and effectively steer the kite.
With the bar at the sweet spot (the point where you can just feel resistance from the bar when using only the weight of your hands and arms to set the kite) the kite’s steering should be reactive. If the steering is too quick or too slow then the back lines will need adjusting. The longer we make the back lines the slower the steering will be. The shorter they are made, the quicker the kite will turn (up to a point, but I’ll leave you to play around with this one).
Ready to be really confused?
This is where things get a little crazy. We would think, given what we’ve just said that the answer to light wind days is simply to shorten the back lines to give us more power and away we go.
If only things were that simple.
By shortening the back lines in light winds we also make the kite that much more susceptible to back stall, which due to the lack of power from the wind will happen that much sooner in light winds anyway. Often this occurs to the point where if we shorten them too much, we can’t even launch the kite as it’s so over sheeted. As a result sometimes on light wind days we have to de-power the kite (i.e. lengthen the back lines/shorten the front lines) more than we would think to prevent over sheeting and allow the kite to fly.
Brain Fried?
This is very much an art not a science and the best way to get your head around it is to go out and play, just spend 2 mins every time you go out, playing with the trim strap until you get a good idea of what it is doing and how it effects the kite, by doing that and applying the logic in this article, you should get this nailed quick smart.
REMEMBER, if you have trimmed your kite and have completely powered up or de-powered depending on what the conditions are and it still isn’t enough: CHANGE KITES! Trimming is not a replacement for correct kite selection.
Want To Learn More?
Learn to Kitesurf in 1 Week GUARANTEED with our Learn to Kitesurf Camp in Tarifa.
Great article! It really helps me understanding how trimming my kite works. Now it’s time to practice it on the beach. Thanks!