Where To Fly?
First pick out a good field or beach to fly at. The bigger and more open the better. Again if you’re not sure where you can and can’t fly kites please check with your local council or kite school who will be only too happy to let you know. Remember that if there are trees or buildings between you and the wind, the trainer kite will not fly properly (see the chapter on the effect of obstacles on wind speed).
Beware of practicing close to obstacles (trees, roads, lamp-posts etc) as they can all get tangled up with the kite, also avoid practicing close to high buildings as these can create up-drafts and eddies which will adversely effect the performance of the trainer kite. If you think of a river running over rocks, those white bits of swirling water just after the rocks are showing exactly the same effect that obstacles have on the wind, causing it to eddy, swirl and generally do nasty things.
The bigger the open space you can find the better. Avoid areas with power lines at all costs. If in doubt consult the section on obstacle effects on wind speed for a recap on things to avoid.
In general, you want to launch your kite where you have enough power to get it off the ground, but not so much power that you get overwhelmed when it launches. This spot will change depending on how much wind you have.
UPwind and DOWNwind
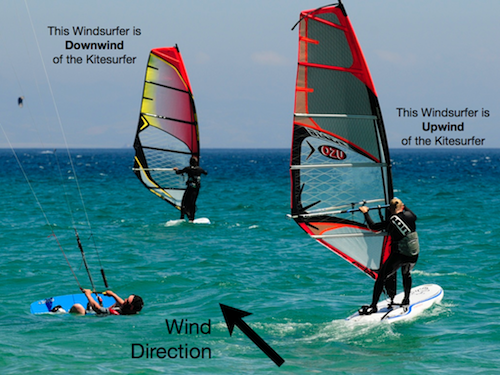
An object upwind of you will be closer to the source of the wind while an object downwind will be further from it. I find this easiest to describe in terms of smell. I am teaching Nick to learn to kitesurf. As is sometimes my way I have not had a bath in about 3 weeks and the wind is blowing on shore (off the sea on to the shore). Now, if I stand nearer to the sea than Nick, along the direct line of the wind, then he will get the full smack of my unwashed glory straight up the nostrils. If however Nick is closer to the sea (and thus the source of the wind) then me he will be blissfully unaware of my hygiene habits and still (most likely) think I’m an alright kind o’ guy!
Setting Up the Trainer Kite
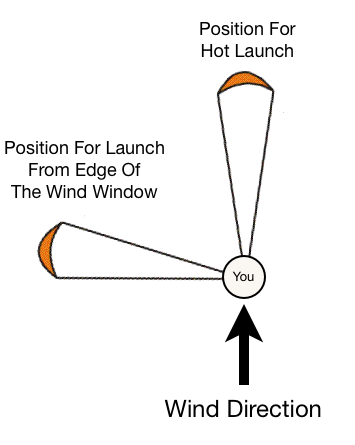
Setting Up To Hot Launch (Light wind only)
Take your kite out of its bag and lay it on the ground with the bridle lines facing up and the trailing edge facing into the wind. Place sand or any other non sharp and fairly weighty object on the trailing edge so the kite doesn’t blow away, or get your mate to hold it in place (brief them that letting go and watching you flying down wind attached to the kite is not big or clever). Starting at the kite unwind the lines from the bar, walking INTO the wind.
Setting Up To Launch From The Edge Of The Wind Window (recommended)
Lay out the kite parallel to the wind and fold the kite in half (folding towards the bar). Weigh the kite down, with sand or other blunt object about half way down the kite, near to the leading edge. Then walk the bar and lines out at an angle of 90 degrees or across the wind.
Whichever method you choose once you’ve fully unwound the lines just check that they are not tangled, you may need to un-attach the lines at the kite end and un-ravel them if they have become tangled to make sure there are no knots or twists prior to launch. If you do need to reattach the lines use a larks head knot.
Packing Away Your Trainer Kite
Packing away your kite is exactly the same as setting it up but in reverse. Land your kite and secure it with something heavy and blunt (like your mate!). Then start wrapping the lines around the handle in a figure 8 motion walking towards the kite as you do it.
The more care you take here the easier it will be to unwind the next time you come to fly your kite. If you make sure the lines are wrapped up tight it will make sure they don’t fall off the handle whilst in storage and save you a huge headache untangling them next time round.
Something to bear in mind is that for the first few weeks of kite flying, the lines are the thing that are likely to give you the biggest problems as they seem to get tangled around EVERYTHING, have patience with them. Take your time and put them away properly and you’ll save yourself some real birds nests in your lines the next time you go kiting.
Once you reach the kite fold the kite in half, ensuring all the bridle lines are inside the kite and then place the lines and handles/bar on top of the wing tips. Then simply roll the kite around the bar until it’s all away and then fold it down so it fits back in the bag.
Kite Gear Care And Pre Flight Checks
The main things to check on your equipment are that:
- You have no knots in any of your lines
- You have no tangles or unwanted knots in the bridle
- Your kite and kite materials are in good condition, any small tears or holes need to be patched before flying the kite
- If you have any knots in your lines or bridle I would recommend you to get them out before you start flying your kite. A knot in the line will reduce the strength of the line at that point by 50%, leading to to greatly increased chance of the line snapping while you are flying.
A great little trick for getting knots out of lines is to take and old piece of cloth and wrap it around the section of line with the knot. Then place the cloth containing the line and knot onto a hard surface (an old book works great) take a hammer and start hitting the knot through the cloth. Do this for about 20 seconds then take another 20 seconds to try to pry the knot loose. Repeat this until the knot works itself loose. Note for the first few minutes it will probably look as if nothing is happening, the key here is patience, this does work just give it a bit of time!
Your kite should be in one piece (fairly obviously!) if there are any small rips or tears in the canopy do not fly the kite but either apply a patch (a bit of duct tape will do in the short term) to both sides of the tear or for larger tears take the kite to get repaired. A small tear or hole will very quickly become a big tear if not patched or repaired straight away. Also check that the bridle is firmly attached to the kite at all points. If you see the bridle pulling away from the kite at any point again stop and take the kite to be repaired before flying.
Care Of Your Kite Gear
The main things to be careful of here are:
- Putting your kite gear away dry and clean
- Avoid areas with sharp rocks or plants when flying your kite
- Putting your kite gear away dry and clean is essential to preserving its life span. If you can’t pack it away like this at the time (because its raining or the weather doesn’t allow) then get out all your kite gear and dry it off at the next possible opportunity. For those of you who are practicing on the beach, sand is the single biggest kite killer of all time. Make sure you get all the sand off your kite gear before packing it away. Or if not possible again do so at the next possible opportunity. Sand will rub against the stitching and the canopy of the kite wearing both out in a very short time. It will also get into the lines and weaken them from within. Flying wet kites (wet foil kites that is, LEI’s are designed to deal with the water) is not advisable as it adds to the weight of the kite and puts a lot more strain on the structure of the kite and bridle and can lead to damage to the kite.
Avoiding areas with sharp rocks is fairly obvious but also be aware of plants with sharp branches or thorns. These are often quite difficult to spot but will trash your kite just as quickly.
Launching The Trainer Kite
[youtube height=”315″ width=”560″]http://www.youtube.com/watch?v=Jue0MrwhkMo[/youtube]
Getting The Damn Thing Off The Ground
Disclaimer
Power kiting is a dangerous sport. Please double check the wind speed and the manufacturers guidelines on the kite you bought before attempting to fly your kite.
Sheet IN Sheet OUT – Only Applicable To 4 Line Kites
On a bar set up, sheeting in is simply pulling the bar towards you, sheeting out…you guessed it, means pushing the bar away from you. In general terms, pulling the bar in powers the kite up and pushing the bar away de powers the kite.
On a handle this translates to either pulling back with the upper section of the handle to power up (sheet in) or push the handle forward so the bottom of the handle touches your wrists to de power (sheet out).
The Safety Leash
Now that you will be getting your kite in the air, it’s time to learn one of the most important things a beginner must know – how to use your safety system. Assuming that your kite has a safety leash (it should) and that you are wearing it (you absolutely should be) all you need to do is this:
“LET GO OF THE HANDLE/BAR!”
So why is this a difficult thing to do? It’s the opposite of your natural reaction. Let’s think about it. You use the safety system when things get out of control; when you get overpowered and don’t have time to react. You’re getting jerked and pulled by the kite and you have more power than you can handle.
What do most people do?</>
They instinctively fight back. They flex their muscles, clench the controls, and fight with the kite (whilst thinking ‘oh sh*!’). They instinctively clench the controls…when what they need to do is let go! You cannot wrestle with the full power of these kites and win! You don’t even want to try – it’s a bad habit to get into. Bottom line: If you get overpowered, don’t fight the kite. Get into the habit of letting go of the controls and if necessary activating the safety system.
The safety leash is always the first thing you attach and the last thing you take off whilst flying your kite and for good reason as it gives you that extra level of security, knowing that all you have to do is let go and all will be cool.
Launching The Trainer Kite
Launching From The Edge Of The Wind Window (recommended)
On a 4 line bar, having set up the kite at the edge of the wind window, attach the safety leash, hook in to your harness, take the bar and walk yourself about 15-30 degrees upwind of the kite and slowly tension the lines by pulling the bar IN and stepping backwards until you feel the kite very gently start to pull against your grip.
If you have a 2 line kite, simply take the bar, walk yourself 15-30 degrees upwind of the kite and tension the lines.
Slowly move back downwind if the kite starts to collapse. At some point (you might need a bit of patience) the kite will start to stand upright on its wingtip. Now slowly start to steer it upwards along the edge of the wind window towards the zenith.
Hot Launch (Light Winds Only)
Having set up the kite directly downwind of the bar, take the bar and hook in. Grab the centre lines with one hand (do not grab onto the flag line). Keep the other hand near to the safety release in case things go wrong. To launch the kite pull the centre lines towards you, you may to pump them slightly in light winds. The kite may flap around a little if it hasn’t been pre-inflated on the beach, while it inflates it will be a little more difficult to control. This is normal, simply pilot the kite to the zenith until it fully inflates as becomes easily controllable.
On a 2 line kite simply give the bar a good tug to initiate the launch.
Landing Your Kite
Anyone can crash a kite and I guarantee you will do it many times before you finally evolve onto a kitesurfing kite (every time you do, think of the beating you’re saving the nice, new shiny kitesurfing kite your soon going to own!) Try to avoid needless crashing of the kite as it will eventually damage the kite and it makes you look…well…like a monkey! To land your kite all you need to do is this:
- Fly the kite to the edge of the wind window. It doesn’t matter where; just get it to the edge.
- With slow, smooth movements, bring the kite towards the ground either at the 3 or 9 o’clock positions.
- Bring your kite down and land it gently to you glamorous assistant at the edge of the wind window.
- Move to your kite and secure it.
- Pack it up and away you go!
- Landing your kite is quite simple, but is made easier by remembering a few key points:
Try to keep your arms extended and in front of you, do not twist the bar around the side of you, move your body to follow the kite in the sky so that your arms are always in front of you.
Keep the bar more or less horizontal or try mirroring the angle of the leading edge of the kite with that of the bar, do not be tempted to use the bar like a steering wheel instead use it like the handlebars of a bike.To steer the kite effectively, think of your arms as pistons when one goes out the other comes in. To start with be gentle, make tiny movements with the bar as you get more confident make the movements bigger.
Things To Remember:
- You will crash your trainer kite! Try not to crash it directly down wind as it is possible to blow seams out of a kite if crashed directly into the ground at 50 miles per hour. Yes, they can move that fast.
- Wind is like a road; sometimes it’s bumpy and sometimes it’s smooth. Your kite may behave well one day and fly terribly the next. Most likely the wind is very different, do not let this get you down and disheartened you, learning to fly a kite in ALL conditions is part of the training.
- Be careful in high winds. Even small trainer kites develop a lot of power. in general a 3m trainer kite will allow a 200lb person to jump 6-10 feet forward when the winds are over 18mph. Always leave yourself room for evasive action (3-5 line lengths).
- If you have someone helping you launch the trainer kite, make sure they move immediately after launching. Also, be nice and share your kite with them.
- It takes most people anywhere from 30 mins to 3 hours to learn to fly a trainer kite proficiently. Don’t expect to be a great flier in 5 minutes.
- Twists in the lines – All kites will still fly exactly the same even with a twist in their lines. To untwist the lines, either fly a complete loop in the other direction, or spin your body quickly around. Most kites can fly with 2 or 3 loops before the lines begin to bind up.

