Posted on Leave a comment

Hand Signals Used In Kitesurfing

 Communicating Over The Wind

As a kitesurfer you need to know the universal hand signals you will see employed on every kite beach the world over. This means that not only can you communicate with other kitesurfers on the beach even when it’s blowing a gale, but also that you understand what others are trying to communicate to you so you can be a help not a hinderance on the beach and join in launching, landing and generally helping out your fellow kitesurfers.

We will take a look at the most used hand signals showing you a goofy (you never know whether to smile or not!) picture and explaining exactly what it means. Please make sure to be polite when doing this. Other people are not there for your convenience and should be thanked appropriately.

Land My Kite…Please!

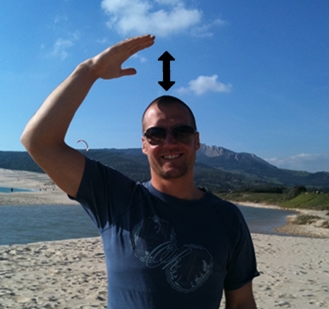
Land My Kite

Patting the top of the head with either hand. Given by the person in control of the kite to a bystander on the beach. The signal means could you please land my kite for me. The person in control of the kite will then bring it down and hold the kite within easy grasp of the lander. The lander should either simply attempt to hold on to the kite if not sure what to do or secure the kite on the beach.

Land Your Kite To Me

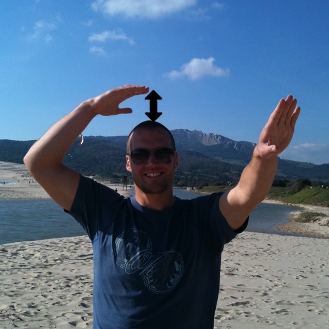
Land Your Kite To Me

Patting the top of the head with either hand whilst pointing at the kite. Given by someone on the beach, this signals tells the person in control of the kite to land their kite to this person. Generally used by instructors but seen in general use as well.

Thumbs Up..All Good

The universal thumbs up all good signal, generally given right before launch to signal the launcher to release the kite. Its opposite, the thumbs down again used in relation to launching the kite is given by the pilot if there is a problem with the kite and they DO NOT want the launcher to release the kite.

Now lastly before we send you out to fly your kite we need to talk about things to look out for when choosing your kite flying location and kite flying etiquette. For the moment we’ll keep it simple as I just want to make sure that when we let you loose on your local beach or in your local park you don’t make a nuisance of yourself and end up ruining your experience and that of other users of the area.

Before you start

Before you even think about hoisting your kite make sure you do a thorough risk assessment of the area you’ve chosen to fly your kite. Remembering the lesson on obstacles and their effect on the wind speed ensure there is nothing in the area creating wind effects likely to cause you problems. You are looking for trees, buildings, hills, cliffs etc and should really be pretty obvious!! The real one to watch out for here, as they’re not always immediately obvious are power lines, do not practice anywhere near power lines!

Make sure you are permitted to fly kites in that area. Sounds simple but more and more kite flying is only permitted in designated areas, outside of these areas you can often have problems with members of the public or more seriously the police. You might also find other kiters telling you to move to protect their own “right to fly” in the designated areas. Remember it only takes a few idiots breaking the rules for the local council to step in and ban kiting altogether. An outcome no one wants, check with your local kite shop or local council first.

The 3 C’s…Check, Check, Check

Check the wind speed. You’ve just gone out and bought a new anemometer, use it, and make sure you stick to the manufacturers guidelines about what winds to fly your kite in. The golden rule here is, “If in doubt, don’t go out.” Better to live to kite another day than get over confident and wind up in hospital with broken bits!

When the wind blows it does not blow a consistent speed all the time. The wind speed changes direction and speed almost constantly. These changes in wind speed are referred to as gusts. If the wind is gusting too high above the average wind speed it makes conditions for flying kites dangerous and unpredictable. For example it’s perfectly feasible to have an average wind speed of 18 knots with a gust speed of 29 knots…that would NOT be a good day for kiting! If the wind is gusting too much then at least until you’re confident…forget it. It’ll be unpleasant and dangerous. How much is too much…very difficult to say but I would say if its gusting 10 knots or more over the average wind speed take yourself to the pub instead.

1. You NEVER Have Right Of Way

The simple rule to follow here if you want an easy life and you don’t want to spoil access to the area where you’re practicing for yourself and for other potential kiters is simply give way to everyone, dog walkers, families, other kiters…everybody. The more polite and considerate you are to other users of the area the better of you’ll be in the long run

So what do I mean by ‘give way’ simply put if anyone comes with ‘twonking’ range of your kite or lines (normally if they come with 50m of you, downwind or 20m of you upwind) either drop your kite or at the very least (and if you have enough control) move the kite to the complete opposite side of the window.

2. Be Aware Of The Space You Are Taking Up

Kite flying takes up an incredible amount of room, at least 25m in every direction downwind due to the length of the lines, you should double this distance to give you a sizable buffer zone as well. So if you reckon you should have clear space of 50m in every direction downwind and at least 20m upwind, you can begin to see how much room you are effectively occupying.

Please be aware this land is (probably) not yours and you must respect other users of that land. It only takes a phone call to the local council from one irate dog walker and the next time you arrive at your favourite kite spot you find signs up everywhere banning the flying of kites at that spot. Councils will pretty much always side with a normal user of the area over a kiter and in many places kiting is being increasingly viewed as a nuisance. Please don’t give councils the excuse they are looking for to stop kiting in your local area…how do you do this?

Simple, be courteous and GIVE WAY TO EVERYONE!
3. Obstacles And Hazards In Your Flight Area Will Hurt!
 Make sure your flight and launch and landing area are clear of any hazards, obstacles or anything else that can hurt if you collide with it. Whilst flying the kite initially you will find it difficult to concentrate on anything else and can easily end up moving around more than you intend. Besides, having something in your flight area that you’re trying to avoid simply makes the whole process much, much harder.

If you have any doubts about where you can and can’t fly kites please get in touch with either your local council or local kite school who will be only too happy to help.

Posted on Leave a comment

Determining Wind Direction & The Wind Window

Where Is The Wind Blowing From?

The final and most important detail we need to know about the wind is which way it is blowing. While this seems obvious, we need to know more specifically than in most circumstances and so have developed several techniques to help us pinpoint it more precisely.

This can be done in several different ways:

Use Your Head

The easiest (at least for me as I have rather large ears!) is to use your ears and the back of your head. Simply turn your back to the wind and turn your head until you can feel the wind on the backs of both your ears. At that point you are looking directly downwind.

Flags are also another good marker, but make sure you’re facing the flag at a good angle, normally directly in front works best, as it’s often very difficult to see which way it is blowing exactly from the side.

As kites will always fly downwind of the person controlling them they too can be used to determine the wind direction. Again make sure you get a good angle on the kite when looking at it when using this method as at distance it can often be difficult to determine the direction effectively.

Using The Sea

Waves can be used as they will often be blowing in the same direction as the wind. However this is not the most reliable method as in a lot of circumstances its quite easy to confuse this wind blown chop, which will help us determine wind direction, with ocean swell, which will not.

Waves are formed by the movement of wind over the surface of the sea. Ocean swell starts somewhere many kilometers from the shore. As wind blows over the surface of the sea small wavelets are formed. Over time and distance these wavelets form together to create bigger and bigger waves, developing a fairly uniform wavelength, that is the distance between the waves and the size of the waves is fairly consistent.

These waves will (generally) all be traveling in the same direction and will gobble up any smaller waves as they move to grow even bigger. If the wind blows for long enough over these larger waves enough smaller waves will be created (and eaten up) to eventually change the pattern and the direction of the waves. When these waves reach our shores they come crashing in in the same pattern that they formed 1000’s of kilometers away.

Wind blown chop is by contrast a much more localised effect, rather than being the result of the combined efforts of the wind and waves over 1000’s of kilometers they are formed by the local wind. Wind blown chop will be much smaller and much more “messy” than ocean swell as the waves haven’t had time to combine and arrange themselves. It is these waves that you should look for to determine the local wind direction.

What Winds Should I Fly My Trainer Kite In?

If you bought your trainer kite new it should have come with some detailed instructions not simply about how to set up the kite but also what winds it is safe to take the kite out in. If you bought you kite second hand or you can’t find these guidelines a quick check on the internet should give you all the information you need. We’ve already talked about determining wind speed in a earlier lesson but please, please stick to the manufacturers guidelines. If you don’t you risk injuring yourself, other people and damaging the kite.

Determining Where The Kite Will Fly

The Wind Window

The wind window is the area where you can fly your kite, and is very important for two reasons:

Your kite generates different amounts of power and will pull in different directions depending on where it is positioned in the wind window.

When you understand the wind window you know where to place your kite for maximum safety in windy or gusty situations. An unexpected gust of wind can carry dangerous consequences.

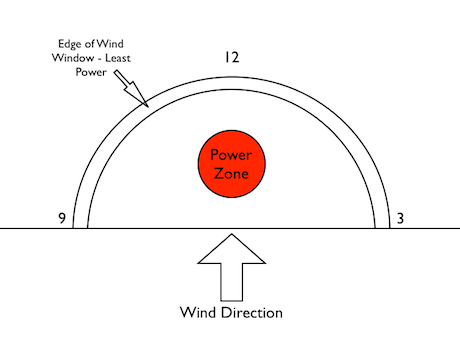
The wind window is broken down into three main sections which are pictured in the diagram below. These sections are:

The Shoulder Or Edge Of The Wind Window

This area is the closest the kite can fly into the wind and is the area that produces the least amount of power. For example, if the kite is flying directly above your head it is in this zone. You want to keep your kite in this zone when you are taking a rest or checking out that hottie walking past. This should be your default position for the kite as it is the safest.

The Medium Power Zone Or Intermediate Zone

This area is the area in between the shoulder of the window and the power zone. The kite starts to build speed when flying through this zone and it “catches” more wind than it does at the shoulder. These two things give it more power. If your kite is in this zone pay attention. It is really easy to send it into the power zone and if you aren’t ready, you can easily be overpowered.

The Power Zone

This zone is aptly named. Here your kite is moving fastest and catches the most wind, so it has the most power. You will use this zone to generate the power you will need for all of your kiteboarding moves. You don’t want your kite in the power zone unless you send it there, so pay attention and keep your kite under control.

Areas of the Wind Window

Finding the Wind Window

Now that we know what the wind window is, how do we find it? To find the wind window just follow these steps:

  • Find the direction of the wind. See the chapter on determining wind direction.
  • Turn and stand with your back to the wind (so that you are facing downwind).
  • Extend your arms straight out on both sides and imagine lines drawn out in both directions.

The wind window is the area downwind of you and it ends at the imaginary lines you drew out sideways with your arms, as well as directly overhead.

Always find out the direction of the wind and get a picture of where the wind window is before you launch your kite. Also, keep in mind that if the wind changes direction, the wind window is going to move too; it is always downwind of you.

Describing The Wind Window

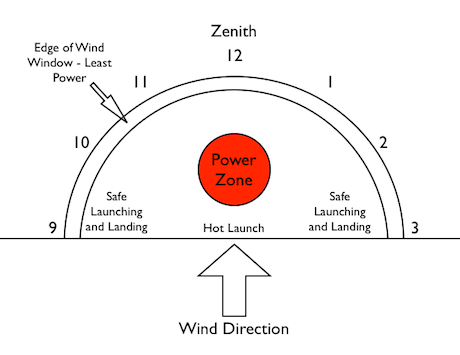
The final thing we will go over about the wind window (right now) is the lingo. To describe where their kite is in the wind window, kiteboarders have broken it down into segments like a clock. To get an idea of the ‘coordinates’ of the wind window are, just:

Stand with your back to the wind, so that you are facing downwind. Then extend your arms out to both sides. Imagine that your arms are the arms of a clock. If your left arm is extended straight out it will be pointing to 9 o’clock position. Your right arm will be pointed at 3 o’clock. Directly above your head is 12 o’clock. Evenly spaced out between 9 and 12 are 10 o’clock and 11 o’clock. Between 3 and 12 are 1 o’clock and 2 o’clock. Take a look at the diagram above to make things clearer.

Now you should be able to describe the wind window in terms of power zones and you should be able to navigate it. So when someone says something like ‘Launch your kite at the shoulder of the wind window, then fly it up to the 12 o’clock position,’ you don’t look at them as if they’re an idiot.

Posted on Leave a comment

The Effects of Obstacles on Wind Speed

[youtube height=”315″ width=”560″]https://www.youtube.com/watch?v=JOWVAMZ69r8[/youtube]

How To Avoid Getting Your Kite Wrapped Around Lamp Posts

There are several effects which will cause changes in the wind speed and we need to be aware of them when flying a kite if we are to have a pleasant experience and stay safe. In this lesson we cover the 4 major effects which you need to know about before you go and hoist and kite. Please don’t just read this page once and forget about it, instead try to notice the effects as your out and about during the day…believe me, being able to spot the signs of any of these effects can mean the difference between a great day flying the kite and an awful one.


Gradient Wind

The wind speed drops the closer to the earth it is, this is because as the wind passes over the earth (or sea) it’s movement generates friction, causing the speed to drop. The more uneven the earth (or sea) surface the greater the effect of this friction and the higher the difference between the wind at ground level and the wind higher up in the atmosphere.

This effect is called Gradient wind.

The earth generally causes more friction than the sea which is why often on beaches with an onshore wind there is a line of ‘dodgy’ wind at the shore line where the wind speed changes as the wind hits the beach and slows down in speed due to the increased friction.

For us kiters this means that what we feel on our face will almost definitely not be the wind speed that our kite is feeling 25m up in the air. With the kite usually experiencing higher wind speed due to its raised altitude. This effect can have a lot more impact than you would think and indeed yacht sails are designed with this effect in mind so the top of the sail has a different shape to the bottom to prevent the fabric from tearing.


Wind Shadow

Wind Shadow

A wind shadow is created by an obstacle in the path of the wind, which is why we huddle behind walls to shelter from the wind sometimes. Objects in a wind shadow will feel much less wind speed than those not in the shadow. Wind passing an obstacle (such as a building) does not simply stop when it hits this obstacle but attempts to get around it any way it can. That is, it will go over, under or around it, this creates a patch behind the obstacle where the wind is very turbulent as it is coming from potentially several different directions at once and the wind speed is much less.

The best way to envisage this is to imagine rapids in a river, when the water hits a rock you get white water around and behind the rock as the water tumbles over the top and around of it in a struggle to carry on moving downstream. This is exactly what we would see if we could ‘see’ the wind. An obstacle will cast a shadow (disrupting the wind speed) up to 7 times its height down wind.


Uplift - avoid this while kitesurfing

Updraft

An obstacle in the path of the wind will not only create a disruption downwind of it (a wind shadow) it will also create a disruption upwind of it. Think back to our example of the rapids, not only do you see white water behind the rock but also in front of it. This is caused by water that cannot get out of the way hitting the obstacle and being reflected back into the path of the oncoming river, causing disruption and forcing the water behind it upwards and over the top (as well as around the sides) of the reflected water, thus creating updraft.

This is an extremely important effect to know about and it is for this reason that we should not kitesurf too close to large cliffs or practice kite flying in-front of large obstacles. The upwind disruption will be felt at a distance in front of the obstacle up to 3 times its height.

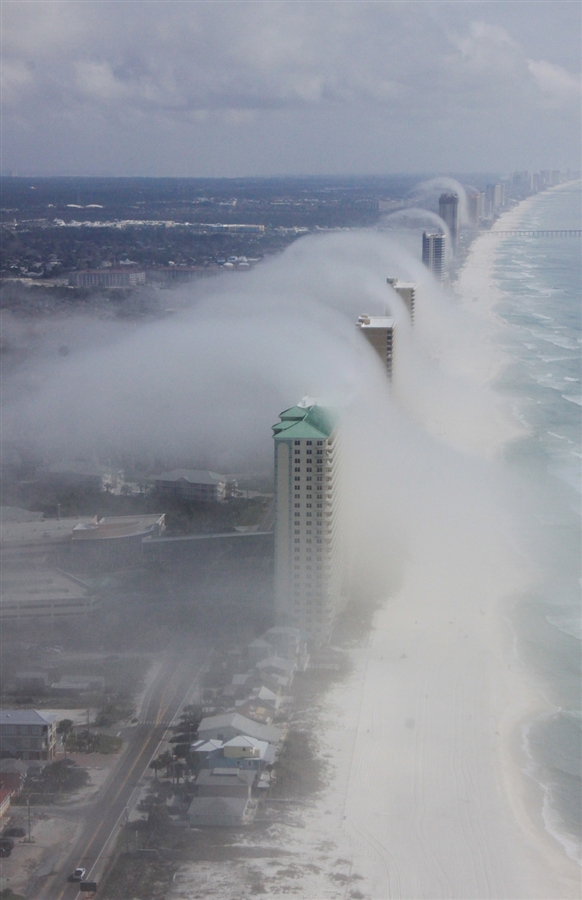
This amazing photo illustrates both wind shadow and updraft very clearly.


The Venturi Effect

The Venturi Effect

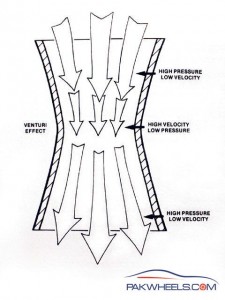
This is particularly pertinent to us here in Tarifa as this is the reason why it’s so bloomin windy here! The Venturi effect teaches us that when wind passes between two obstacles the wind speed will increase as it is forced through the gap in between them.

So here at Tarifa we have the straights of Gibraltar and on either side we have mountains, the Riff Mountains in Morocco and Gibraltar on the Spanish side, wind coming from any direction is forced through this gap and accelerated out the other end much like a wind tunnel, giving Tarifa its famously consistent Levante and Poniente winds.

Posted on Leave a comment

The Wind Forecast & Interpretation

 How To Predict The Wind

In any wind sport you need to know not only what the wind is doing but what it is going to do, if you are to make the most of your time and be safe whilst you are practicing. The weather can change in a matter of seconds and it’s not unusual for the wind to ratchet up by a considerable amount, literally in the blink of an eye.

Be prepared, check the wind forecast every time before you go out and you’ll have a bit more knowledge about what the weather could be throwing your way.

Where To Check The Wind Forecast

At this point I’m not going to go into too much detail about interpreting actual weather maps and synoptic charts. Predicting the wind is certainly possible from these maps and will often give you a much bigger picture of what’s going on in the surrounding area. Synoptic charts do however, take a bit of skill to interpret correctly.

There are currently several websites that take this data and turn it into a format which is easy to read and very useful for us as kitesurfers. These websites are typically easier to interpret and while not incredibly accurate on a micro level can, when combined with a bit of local knowledge, give you a good idea of what’s likely to happen for the next few days.

The 2 main websites we’re going to look at for wind forecast information are windguru.cz and windfinder.com as these provide (more or less) global coverage and can be updated with custom spots if needed.

Windguru

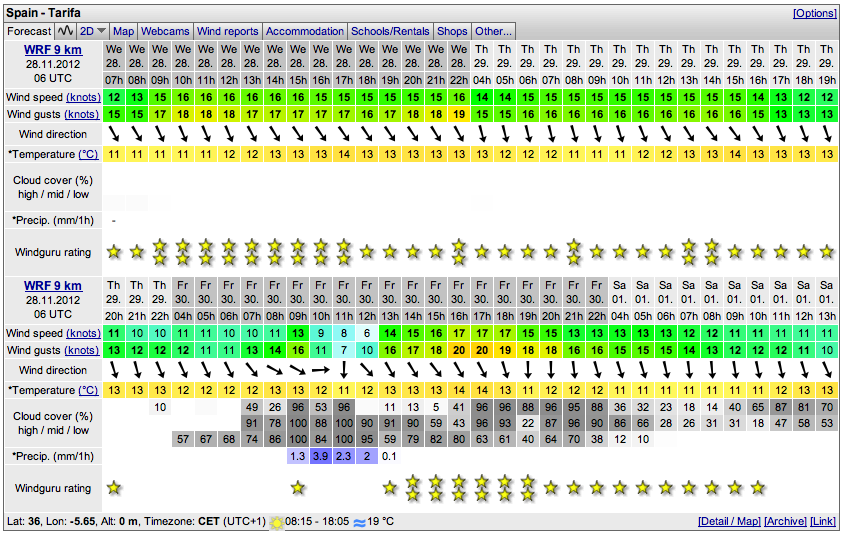
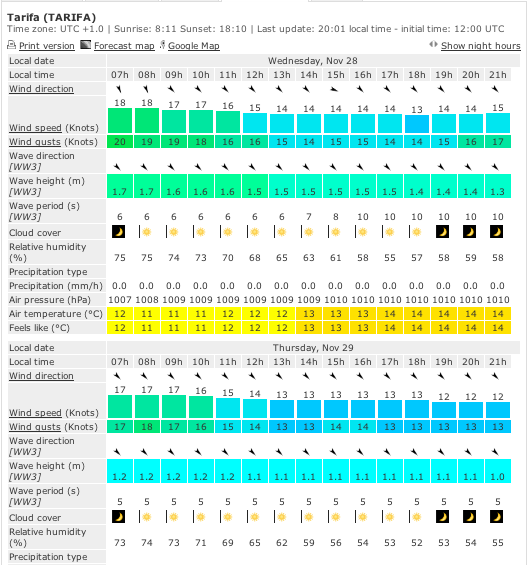
Here’s a screen shot from windguru showing a week in Tarifa.

Windguru

As you can see its pretty self explanatory. The wind forecast is given in the 3 rows marked, wind speed, gust speed and modified wind speed.

One thing to notice is the modified wind speed row.

Not all forecast locations have this row. These modified wind speeds are often created by the users and will be present in any location where the predicted wind speed as given by windguru is consistently incorrect due to local effects.

Another thing to notice here is the gust speed. If the gust speed is significantly more than the wind speed this can lead to dangerous conditions where the kite is bucking all over the place and can lead to you being thrown all over the place like a rag doll.

On the windguru website, there are several other forecasts under this initial forecast (not shown here), all these forecasts simply use different models or different range forecasts and will often be subtly different from each other. See that WRF 9km in the top left hand corner of the forecast page? The WRF is simply the model being used and the 9km tells us that this forecast covers a 9km grid around the area of Tarifa…yes thats right, so what we’re essentially being told is that the weather is doing this somewhere within 9km of Tarifa…so you can already start to see the limitations of these services.

You’ll need to look at and then combine in subtle ways all the different models and ranges (as well as adding in a large dollop of local knowledge and no small amount of divine inspiration) to build up a big picture and have any chance at working what the wind is actually going to be doing on any given day.

To reach the forecast page for any particular spot simply choose your continent, country and spot from windguru’s home page. If you don’t see your local spot listed, get in touch with the guys at windguru and they’ll be only too happy to add it for you.

A word to the wise, windguru offers a paid service which is a lot more accurate than their bog standard forecast…but I’m not convinced that their paid service doesn’t just give you the same information that you can find on most other websites for free.

Windfinder

Screen shot of the same week shown in windfinder.

Windfinder

You can see that Windfinder offers pretty much the same information but in a slightly different format. The choice between the two sites is mainly one of aesthetics. Some people find windguru easier to understand and others prefer windfinder. In terms of which is more accurate it seems that it varies day by day and spot by spot, bear in mind that both of these sites use the same data but simply interpret it slightly differently. My advise would be to try both and use all the data you can until you start to see patterns building for your local spot.

Once you’re happy with interpreting the data and applying you’re own knowledge of the weather at your local spot you’re ready to become a true wind spotter and start boring everyone around you with your constant harping on about the wind and what it’s going to do…remember non kitesurfers generally don’t care if its going to be a force 3 or 5 today!!

Note: both these sites now have apps for iPhone and Android so you can have this handy information with you where ever you go.

The other website we LOVE and I have to say is quickly becoming my no. 1 favourite (mainly because it looks amazing) is windyty.com, check it out, you’ll love it! The reason we haven’t talked about it here is because it’s so damn easy to use…have a look you’ll see!

What is Wind?

Before we actually fly a kite we need to have some idea of the wind speed. This will (hopefully) prevent you from hoisting the kite in an unfeasibly strong wind and suffering the inevitable consequences! So what is wind? Simply put wind is the horizontal (usually) movement of air. Measuring wind speed is problematic at best as wind is not a constant force but will change speed and direction regularly. These changes in speed and direction are referred to as:

  • Gusts – when the wind increases in strength.
  • Lulls – when the wind decreases in strength.

These changes in wind strength or speed are often accompanied by a change in direction. Wind speed is officially given as a measurement of wind speed and gust speed. Wind speed is measured as the average wind speed over a 2 minute period. While the gust speed is the strongest measurement taken in the last 10 minutes.

The Anemometer

Anemometer

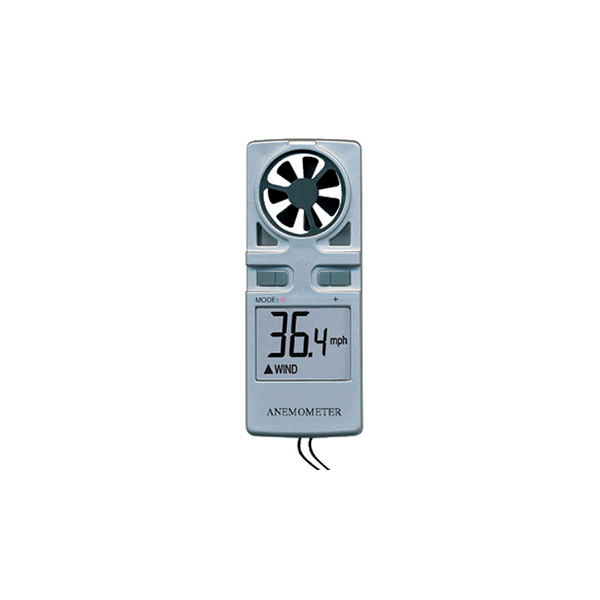
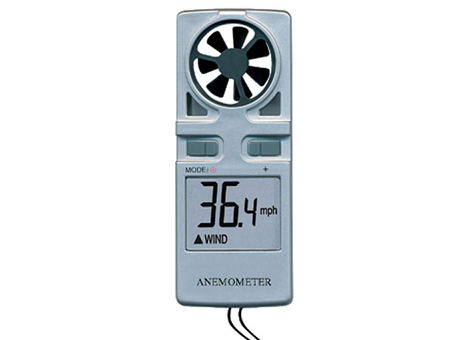
The most accurate way we can measure wind speed at the beach is with an anemometer (or ‘wind meter’ for the tongue tied, or ‘little windmill’ or even more regularly… ‘thingy’!). This handheld device when held aloft and facing the wind will give an accurate measurement of the wind. Most anemometers these days will record average wind speed and display the strongest gust.

To use your anemometer simply turn it on and hold it up above your head making sure the cups are able to catch the wind, the longer you can leave it above your head the more accurate reading you should have, about 2 mins should be fine (feel the blood draining from your arm?). Then check off the readings and your good to go…or not as the case may be.

Some points to bear in mind, the anemometer gives you a wind reading at the height you are at…most often beach level. Your kite can be up to 25 m above this (depending on line length) where the wind could be a little stronger. This is especially true if there are obstacles in front of you (see the chapter on the effect of obstacles on wind speed for a full description).

An anemometer cannot measure wind density which will change dependent on how much moisture is in the air and the heat of the air. The denser the air the more powerful it will be.

Sometimes wind can come and go, one minute feeling strong and the next dying almost to nothing. If you feel this is the case on any particular day you can repeat this exercise at 5 minute intervals to see how the wind is behaving over a longer period of time.

You will often hear kite surfers and other wind sport enthusiasts referring to wind not by kph or knots but in terms of a number between 1 and 12. For example, “its blowing a 3 today.” This is not some obscure code but is what is referred to as the Beaufort scale. So named as it was created in 1806 by Sir Francis Beaufort, before we had fancy devices for measuring wind. Our man Francis decided to create a scale of wind strength based on visual signals, so anyone upon arriving on the beach will have some idea what the wind strength is simply by looking for visual clues, without the need for an anemometer.

Beaufort
Number
Wind
Speed (mph)
Seamans
Terms
Effects on Land
0 under 1 Calm Calm, Smoke rises vertically
1 1-3 Light Air Smoke drift indicates wind direction, vanes do not move
2 4-7 Light Breeze Wind felt on face, leaves rustle, vanes begin to move
3 8-12 Gentle Breeze Leaves & small twigs in constant motion, light flags extended
4 13-18 Moderate Breeze Dust, leaves and loose paper raised up, small branches move
5 19-24 Fresh Breeze Small trees begin to sway
6 25-31 Strong Breeze Large branches of trees in motion, whistling heard in wires
7 32-38 Moderate Gale Whole trees in motion, resistance felt when walking against the wind
8 39-46 Fresh Gale Twigs and small branches broken off trees
9 47-54 Strong Gale Slight structural damage occurs, slate blown from roofs
10 55-63 Whole Gale Seldom experienced on land, usually with widespread destruction
11 64-72 Storm Very rarely experienced on land, usually with widespread destruction
12 73+ Hurricane Violence and Destruction!
Top Tips When Using The Beaufort scale
  • Wind will feel and look stronger when it is blowing onshore
  • Wind will feel and look lighter when it is blowing offshore
Advantages Of Using An Anemometer

The great thing about using an anemometer when you’re just starting out is that you can get an idea of what the real wind speed is and compare it to visual signals so that after a while you can simply rock up at any given location and say with a great degree of accuracy what the wind is doing and which kite you’ll need.

However try not to get dependent on it, technology fails…especially when exposed consistently to salt and sand. You need to become confident at predicting which kite to use simply by feeling the wind on your face.

The wind speeds you should attempt to fly your kite in will vary depending upon which kite you have and how much you weigh, you should have detailed instructions and safe wind ranges with your kite. However, as a general rule of thumb anything over a Force 5 (between 19 and 24 knots on your anemometer) should be treated as too much until your confident, even less (avoid anything over a force 3) when you are just starting out.

If you own an iPhone or Android Phone there are now several handy apps which turn your phone into an anemometer. By measuring the wind blowing into the phones microphone these apps give a reading of what the winds doing. Not always entirely accurate we have to say but they’re worth a try as most of them are free and it’s a cute way to impress your friends. More interestingly there is now a plug in anemometer available for smart phones which (although we haven’t yet tested it ourselves) is getting some very good feedback across the web. Have a look at the WeatherFlow website for more info.

Posted on Leave a comment

Different Types Of Kites & Equipment You’ll Need

[youtube height=”315″ width=”560″]https://www.youtube.com/watch?v=gEHduwqQ2gI[/youtube]

As far as we are concerned in power kiting, kitesurfing, snow kiting or land boarding/buggying there are, in essence, 2 different types of kites. Very briefly these are:

The LEI Kite

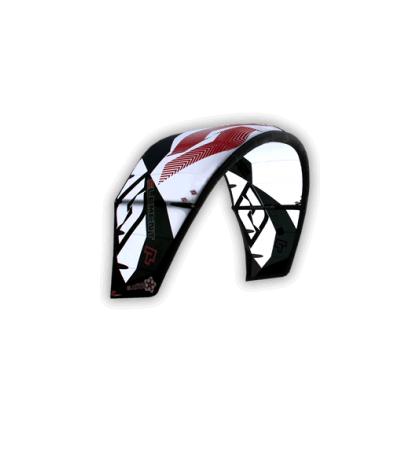
Leading Edge Inflatable (LEI) Kites – LEI simply means that the kite has an inflatable structure, any kite that needs to be pumped up is an LEI. This classification can be broken down into C, Bow, Hybrid and Delta style kites.
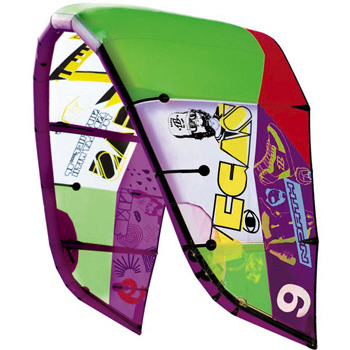
LEI Kitesurfing Kite


The Foil Kite

Foil/Power kites – Foil kites look very similar to the wings used by parascender’s and can be broken down into open and closed cell kites. Foil kites are not (generally) inflated with a pump but instead take their shape from the air flowing over and through them.

The Foil Kite


We’re not going to launch into a full discussion of the relative pro’s and con’s of each of the different types of kites at this point. All we want to do here is show you the different types of kites and very briefly give you an idea of some of the characteristics of each.

4 Line vs 5 Line Kites

Most modern kites will have 4 lines, 2 centre lines and 2 back lines. The centre lines attach to the kite nearer to the centre of the kite and the back lines attach at the back wingtip of the kite. If a kite has a 5th line it will attach in the very centre of the kite.

LEI Kites

The C Kite
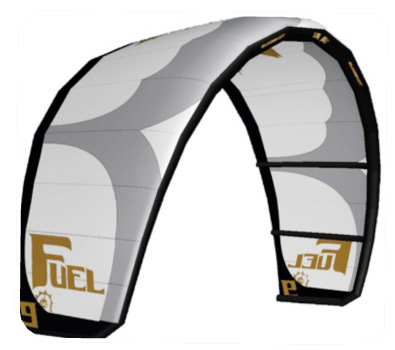
The C Kite

C Style – C style types of kites are recognisable by the lack of a bridle and the distinctive C shape. These kites are the kites that many of us old schoolers learnt on. Fast and powerful through the turn they do however suffer from a lack of de power which has led to their decline in recent years. Recognisable at the beach by their distinctive blocky wing tips and clear corners. These kites have no bridle and the lines attach at each of the 4 corners of the wingtips.

C kites can be either 4 or 5 line, however, if they have 5 lines the fifth line should attach directly to the centre of the kite at one point. If the fifth line splits in any way or joins to a line which then splits and attaches to the leading edge in 2 or more places the kite is a hybrid kite and not a true C kite.

Originally the fifth line was designed to assist with relaunch as it enabled the kite to be pulled up into the relaunch position once it had crashed. Recent improvements in kite relaunch design have rendered this system pretty much obsolete and these days it is mainly used for safety as a kite flagged onto the fifth line will depower 100% and is the safest kind of safety system there is.

The fifth line on a true C kite is not designed to be under tension, the kite does not fly off this line it is solely there for re launch and safety. Conversely the fifth line on a hybrid kite will be under tension as it actually affects the flight characteristics of the kite.

The Bow Kite
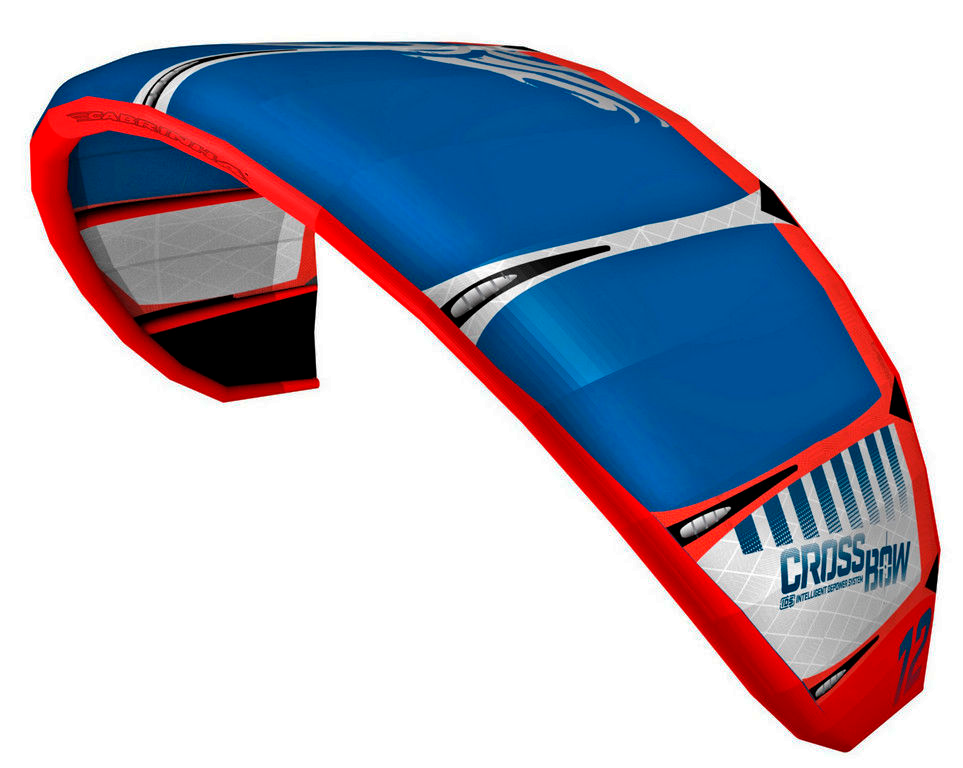
The Bow Kite

Bow Style – named after the distinctive bow shape of the kite. To be a Bow kite the kite must have a bridle and most will have distinctive swept back wing tips. The bridle on these kites allows for almost 100% de power which means these kites are safer and much more comfortable to ride for people getting into the sport. This alone has led to these kites becoming the dominant kite on the water these days with most schools now teaching on bow kites and many riders preferring them due to their ease of handling and increased safety.

Introduced back in 2005 and said to have been inspired by a thread on a forum, the Bow kite has now spawned several variants. All the kites mentioned below are basically different styles of Bow kites. Several manufacturers have taken the basic Bow kite design and further tweaked, thus you can see the Naish Sigma kite (which has a bent leading edge), and several other funky designs however we only deal with the widespread and widely adopted design trends here.

The Hybrid Kite
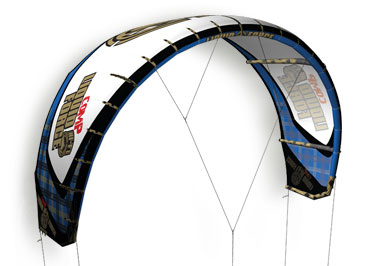
The Hybrid Kite

Hybrid Kites – a trade off between C and Bow style kites. Hybrid kites will always have a bridle of some sort but will also have a concave trailing edge (as opposed to a bow kite which will have a convex trailing edge).

Hybrid kites can be referred to as either hybrid bow kites or hybrid c kites, which simply refers to which design they are closest to, a hybrid C kite will more closely resemble a C kite with the typical C profile but will have a bridle of some sort. Where as a hybrid bow kite will be more similar to a bow, possibly the only distinguishing feature being the concave trailing edge. There now also exist Hybrid Delta kites which again is a Delta kite with a concave trailing edge.

Hybrid kites are designed to capture the best of both kites combining the raw aggression of the C kite design with the precision and flexibility of the Bow design.

The Delta Kite
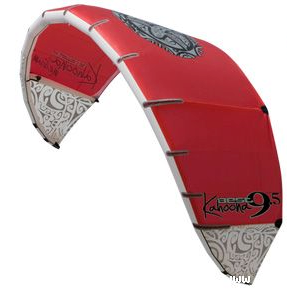
The Delta Kite

Delta Style kites – Delta style types of kites are recognisable by their highly swept back wing tips. These kites are designed to relaunch easier and fly more efficiently in light winds. With some loss of top end performance.

A relatively recent design innovation they were originally introduced in 2009 and have since taken off with most major brands now offering their own design in some shape or form. Due to their easy relaunch, great handling and light wind performance they have become very popular with schools. While not necessarily the kite of choice for the advanced riders they do offer the beginner an even faster route into the world of kitesurfing.

SLE Kites

You are going to hear this term thrown around a lot in Kitesurfing. SLE stands for Supported Leading Edge. This term is used to refer to any kite that has bridles attached to its leading edge. Bow, Hybrid and Delta kites are therefore all SLE kites, C kites are not.

Foil Kites

The debate about foil kites vs LEI kites has been raging in kitesurfing and many other power kite sports for as long as I can remember. General wisdom states that a foil kite is better off the water (snowkiting, landboarding etc) and an LEI kite is better on the water (kitesurfing). Recently there is a growing band of supporters for foil kites amongst kitesurfers and they are definitely becoming a more common sight on the water. One of the main reasons they haven’t been more widely accepted in the kitesurfing world is the price tag, as they can cost up to double what an LEI kite costs. Which you prefer is simply a matter of taste and their are staunch opinions in both the LEI and the foil kite camp. My advise would be to try both types of kites and make up your own mind.

Foil kites possess the obvious advantage of not needing to be inflated, something that all LEI riders who’ve ever tried to inflate a 16m kite can appreciate the value of! They have a wind range comparable to the modern bow kites and are very similar in appearance to a paraglider.

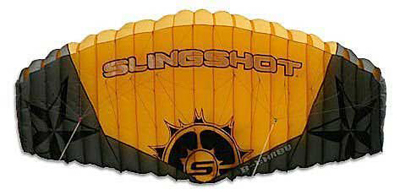
The Open Cell Foil Kite
Foil Kite - Open Cell

Open Cell – These kites are designed for use on land and have intakes (cells) along the leading edge of the kite designed to allow air to flow inside the kite and over the canopy. They rely on constant airflow to keep the cells inflated and so cannot be used on the water as if they crash in water these cells the material quickly becomes saturated while the open cells allow water inside the kite which makes relaunch impossible.

The Closed Cell Foil Kite

Foil Kite Closed Cell

Closed Cell – The same as open cell but designed for use on water. These kites use inlet valves to hold air in the chamber. The pressure inside the cells keeps the valves open so once the kite crashes and the airflow stops the pressure drops and the cell door closes preventing water from entering. Relaunch is then a simple matter of tugging on the power lines.

While it’s unlikely that you’ll fly all these different types of kites it is useful that you know what you’re talking about when it comes to the different flavours and styles of kites out there. Marketing speak around kitesurfing has become so difficult to interpret and negotiate that by having a grounding in the different terminology used to describe kites you can at least start to form your own ideas on how different types of kite behave and the major differences between them.

Equipment You Will Need To Start Your Training

Here we introduce you to the actual kite equipment you will need to begin your training. Go out and beg, borrow or steal it as fast as you can!

The Trainer Kite

Foil Kite Closed Cell

The most essential bit of kite equipment to kick start your training. Kitesurfing, landboarding, snowkiting or buggying are 80% about the kite. If you can control the kite you will learn these sports in a matter of hours not days. A trainer kite is the safest and fastest way into power kite flying and spending 10+ hours flying a trainer kite before arriving on course will likely reduce your learning time by 2 – 3 days…saving you a hell of a lot on course fees!! It also means when you get back you have something to teach your partner, kids, grandparents or friends on!

Every hour you spend flying a kite prior to trying to put a board on your feet will double your chances of getting up and riding, hopefully avoiding the frustration of continually crashing your kite into the water. Snow kiting and land (power) kiting can be learned in one tenth of the time that water kiting can be learned and a basic trainer will get you started down this road. You’ll also find that you don’t crash your full size kite half so much, meaning that when you do finally buy a full size power kite it stays in much better condition for longer!

The trainer kite we are recommending you learn on is the Flysurfer Viron. We actually use these kites in our kite school and I have to say we’ve been absolutely blown away by their performance. Flying on 5 lines they are absolutely stable, even in gusty winds. Their wind range is incredible so you’ll find yourself able to fly them in almost no wind up to howling gales…safely. They are so ridiculously easy to handle and relaunch you’ll be able to fly them all day with no real problems and best of all they handle the same as the LEI kites you’ll be flying once you’re up and riding.

They are also perfect for starting out in landboarding or snowkiting and are forgiving enough that (once you know what you’re doing) you can teach you entire family on them.

They are however a little on the expensive side!

Other cheaper alternatives exist. A simple 2 line trainer kite can be found for around 20 €, with these it is generally a case of you get what you pay for. Try to get one with a bar if you can, but the most important thing is to get something and get flying.

A kite with a control bar helps (as opposed to handles or simple straps) as it is similar to the kitesurfing kites set up and if you feel so inclined you’ll be able to attach a windsurf harness line to the bar and invest in a harness so you really get used to the hooked-in feel of kitesurfing. This also prevents you (to a certain extent) developing bad habits when you move up to 4 line kites.

If you do opt for a 4 line trainer kite beware , these boys pack a punch, we wouldn’t advise anything over 2m and even then treat it with respect (the Virons are a little more gentle than most and a 4 or even 6m is probably fine).

Helmet

An absolutely essential bit of kite equipment, if you are serious about doing the sport…please, please, please never fly a kite without a helmet. I know you may think it looks goofy but better that than a stint in hospital with bits broken off your head. Any helmet will do to start with, even old bike helmets are better than nothing. Remember snowboarders used to scoff at helmets until enough of them got dropped on their head to realise they were actually a pretty sensible thing to have!

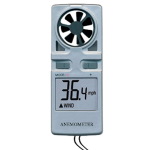
The Anemometer or Wind Meter…or thingy!
Anemometer

These are great bits of kite equipment and will last you your entire kitesurfing career. This is essential so you can be sure what strength the wind is blowing and whether you should loft your kite or go to the pub. We talk more about these in a later chapter.

Kite Killers

If you’re going to be flying a kite you need one of these, absolutely essential bits of kite equipment, unless your kite comes with an inbuilt safety system and leash (the Viron does). With one of these babies fitted snugly around your wrist you can let go of the bar and watch your kite fall gracefully (and powerlessly) to the ground while leaving it still attached to you. Thus means you can simply walk over and retrieve your fallen kite. Without a kite killer fitted, when you drop the bar, your kite, bar and everything will simply fly off down the beach away from you and inevitably land in the nearest barb wire fence…even if there’s not one for miles around they always seem to find them. You also look like a damn idiot as you have to chase the kite down the beach for 20 mins.

To fit your kite killers attach one end to your wrist (it will be obvious which end) and the other to one of the back lines (the outside ones on a 4 line kite) ensuring that where you attach it is at least 1 kite span (the length of the kite from wing tip to wing tip) away from the bar. This will ensure that when you let go of the bar the kite fully ‘flags out’ and flies only on one line powerlessly. Most kites should have a stopper ball or knot to show you where the kite killers attach.

NOTE: If you have bought one of the Flysurfer Virons we recommended earlier they come with their own leash and safety system and so you don’t need any kite killers. I swear we’re not an affiliate!

The one thing I haven’t mentioned here is probably the most important…yourself. You obviously need to be in good shape to kitesurf and to that end we’ve put together a free 7 day kitesurf specific workout. You can grab your free copy here >>